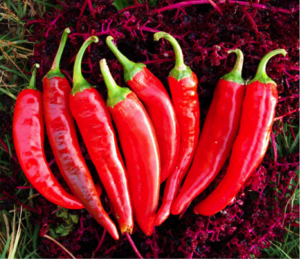
Grow Your Own Guajillo Chile Pepper

Filed Under (Chilli Growing) by Chilli Willy on 17-11-2014

Tagged Under : , , ,

For Chilli-Willy

By Ramon L. Manego

November 7, 2014

Photo by: https://www.horizonherbs.com/images/products/Pepper_Guajillo.jpg

Photo by: https://www.horizonherbs.com/images/products/Pepper_Guajillo.jpg

Guajillo or Mirasol pepper is a rare variety of chile that is said to have originated in Mexico. It is typically an annual vegetable that is very easy to grow and requires minimal care. Guajillo is smaller than other Anaheim chile varieties, but is much richer and milder in flavor and it is the second most commonly used pepper in Mexican cooking. The plant grows to a height of 3 feet, producing fruits that are 4 to 5 inches long and with medium heat.

Let’s start planting. Guajillo pepper is best planted from seed indoors in temperate climates. The best time to start your seedling indoors is early in spring. Fill your seed starting container with good quality potting mix and place 2 to 3 seeds in a ¼” deep hole. In order to germinate, the seedlings must have a steady temperature of between 70 -85 degrees F. You can use a heating pad underneath the container if your home is drafty.


Water your plants lightly, keeping the soil moist but not soggy and never let the soil dry completely or the germination process will fail. Germination will normally take about two to three weeks.

Once the seeds have sprouted, take them outside for a few hours every day to harden them, and once the plant has grown 4-6 inches, they are ready for transplanting outside in your garden. Keep in mind that Guajillo pepper is tender, so you need to make sure that the temperature is mild when you start transplanting.

Set your plants where they can get full sunshine. The soil should be well-draining with a 7 to 8 pH level, a preferred soil condition of Guajillo pepper. Set them at least 18 inches apart to give them good air circulation when they have matured. During hot or dry weather, it is best that you mulch your pepper plants with organic materials to keep the soil from drying up fast, and help prevent weeds from setting in. Apply diluted, water soluble fertilizer about four weeks after transplanting.

Your Guajillo pepper will start fruiting in about 75 days from transplanting, and you can start picking them while they are still green. Always use a sharp knife or scissors when removing the peppers and leave about an inch of stem attached. You can also leave the fruit to ripen and dry to make your own Guajillo chile powder. Have fun gardening!

If you want to learn more about chilli growing, then have a look at our chilli growing guide.


About Ramon

Ramon Mañego writes for Organics Superfoods Store. Organic Superfoods Store is an online store, based in Florida serving their customers since 2012.

Find out more at:

https://organicsfs.com

https://www.facebook.com/superfoodsstore

https://plus.google.com/+Organicsfs

https://www.pinterest.com/organicsfs

https://twitter.com/organicsfs

LightWave T5: Is This The Most Flexible T5 Grow Light?

Filed Under (Fluorescent Grow Lights) by Chilli Willy on 13-10-2012

Tagged Under : , , , , , ,

LightWave T5 2ft 4-Tube 96W

Model: LightWave T5 2ft 4-Tube 96W

The LightWave T5 is a relatively new indoor grow light, but despite this it is already one of the most popular choices for a variety of growing and non-growing applications.

Unlike most fluorescent grow lights, the LightWave runs an ultra-quiet solid state ballast which emits little to no heat during operation, making it ideal for indoor use or for small spaces, without the need for lots of expensive ventilation systems. Just plug in, hang the lights and start growing.

The LightWaves all use T5 growing tubes, hence the LightWave T5 name. T5 grow light tubes are compact, emit high amounts of useful light for plants, run cool, last long and are cheap to replace or exchange at different stages of plant growth, such as for the propagation and flowering stages.

Housed in a compact metallic frame, the LightWave T5’s are a really neat solution to indoor growing. The can be easily mounted almost anywhere due to their light-weight construction via 2 wires, which allow you to hook them to a pair of grow light ratchet hangers, which give you the flexibility to quickly adjust the distance the grow light is from your plants.

Additionally, LightWave T5’s are suitable for use as aquarium lighting and reptile lighting.

So, if you’re looking for a low cost, effective and highly rated, then look no further than the LightWave T5, which is available in 4 wattages to suit your needs.

You can have a look at the range T5 grow lights in our online store.

A collection of best tips on how to grow chillies successfully

Filed Under (Chilli Growing) by Chilli Willy on 23-07-2012

In addition to our comprehensive growing instructions at https://www.chilli-willy.com/growing-instructions we also recommend the following best tips to ensure success in growing chillies.

To start, seeds must be germinated in a place that is consistently warm, as sometimes low night time temperatures can confuse the seeds and cause erratic germination.

We recommend an optimum temperature between 27-32 degrees C (80.6F approx – 89.6F approx). You can either use a heated propagator or an airing cupboard – anywhere that has a consistently warm temperature.

Alongside this, make sure that your germinating seeds are kept moist but not soggy. The best way to water them is with a spray mister from the garden centre, as this minimises soil disturbance.

After your seedlings have sprouted, move them carefully into a well lit area to get as much sunlight as possible (but not too hot at this stage), and avoid the use of any fertilisers until your plants have at least 3 sets of leaves and look strong.

When watering your plants, you can then begin adding small amounts of a good organic based fertiliser containing seaweed, like Chilli Focus, which we stock in out store.

Chillies like to have their soil dry out before they are watered again as they don’t like to swim!

As you chilli plants get bigger, you’ll need to pot them on, but make sure you choose the next pot size up and not one that is too big - chillies like to outgrow their containers. A good way of checking if your chilli plant is ready to pot on is to observe the bottom of the pot - if the roots are emerging through the drainage holes, then it’s time for a bigger pot.

Chillies are incredible rewarding to grow and are also extremely good for you when used in cooking.

Following these simple tips will help you achieve the best results when growing chillies. You can read more in our comprehensive chilli growing guide.


PS. When it’s frosty, you’ll want to bring your chilli plants indoors!

PPS. Chillies are perennials and will continue to produce fruit for many years if looked after properly. Make sure you read our guide on overwintering chillies for more information and a how to guide.

Can You Use Fluorescent Grow Lights to Grow Plants All Year Round?

Filed Under (Fluorescent Grow Lights) by Chilli Willy on 25-01-2012

Most of a plant’s vegetative growth occurs early on in the growing season and tapers off as the plant prepares itself for fruiting in the warmer months.

To help make sure your plant produces a good harvest, you need to make sure it has grown well during this early phase. The challenge is getting enough light during the colder months to achieve this.

You can achieve impressive results by supplying your plant with the extra light it needs in order to grow large and strong before the fruiting season starts, and a bigger healthier plant has the potential to produce a much larger harvest.

Fluorescent grow lights are ideal for this application, because unlike more “commercial” type units such as high pressure sodium and metal halide units, they are quieter and give out less heat, which means you can position them closer to your plants without any heat problems and for maximum benefit. This also makes them safer and more economical.

Growing plants under fluorescent lighting is ideal if you want to give them a boost during the colder months, and then transfer them outside once the warmer weather arrives, ready for flowering and fruiting. However you can also grow your plants indoors if outdoor space is limited or you do not have a sunny windowsill.

Fluorescent grow lights are ideal for growing all sorts of indoor plants, from chillies to cooking herbs.

Most fluorescent grow fixtures come with a white/blue type bulb fitted, which is a propagating bulb and ideal for the propagation and vegetative stages of plant growth. These white/blue spectrum bulbs are great all-rounders, but you can also easily swap this type for a red spectrum tube, which is more suited to flowering and fruiting.

So now you have a couple of great options for growing plants indoors. You can use the white/blue propagation bulb as an all-rounder to give your plants a good boost at the beginning of the growing season, and then transfer them outside when it gets warmer and sunnier, or you could swap to a red flowering tube to continue growing your plants indoors.

A good choice for growing plants indoors is the LightWave T5, which is a compact unit that uses interchangeable fluorescent T5 tubes to produce high levels of light that plants love.

So, boost your plants by giving them the light they thrive on and you’ll soon be rewarded with much happier and more fruitful plants, whatever the weather!

Is March really the best time to plant your chilli seeds?

Filed Under (Chilli Growing) by Chilli Willy on 20-12-2011

Sow your chilli seeds earlier for better harvests.

So, you have decided to grow chillies from seed. Or you have been growing chillies from seed for a while and wonder why you are not getting the sort of harvests that growing chillies is all about - enough to cook with until next season’s crop! Read on to find out how sowing your chilli seeds early can increase your chilli harvests dramatically.

Our last post was on, but this time we would like to share with you some tips on how to get the best chilli harvests by sowing your chilli seeds earlier in the year.

Conventionally and quite rightly, March has always been mentioned whenever you ask “When is the best time to plant my chillies?”. Of course, this is very true. You can indeed sow your chilli seeds in March and get some decent results, but first, let’s take a look at the possible reasons for this:

First of all, like most vegetables, sowing your chilli seeds in March seems like the right thing to do. The chances of frost have usually cleared, and March signals the arrival of spring time. A time we usually associate with sowing chilli seeds.

If you do sow your chilli seeds in March, you will probably produce half decent results, and depending on how well you feed your plant and how much sunlight it gets (and also how warm you keep it, more on this in another post), you should get an average harvest at the end of the growing season.

However, as always, sometimes vegetables and sowing times are grouped together for ease of reference and quite often, you can always achieve better results by focusing only on the type of plant you are growing. And this is certainly important to remember when sowing your chilli seeds.

Sowing chilli seeds outside is not advised whatever the weather, so if we take a look at why you would want to sow chilli seeds in March, it is not based on the outside temperature (or even the indoor temperature), as chilli seeds require a constant temperature of between 27-32 Degrees C. to germinate succesfully. So a limiting factor is not the time of year for germination.

You can germinate chilli seeds at any time of year with the right temperature and mositure levels. However the ideal time to sow chillies is in fact as early as possible in the year - as early as January or February.

It may be cold outside, but given that chilli seeds require warmth and heat (from a heated propagator or an airing cupboard) this is not a problem. The benefits of sowing your chillies seeds earlier in the year are plentiful:

When you sow your chilli seeds early in the year, you are actually extending the growing season quite significantly. Often, when you start growing chillies, you may not be doing all the things needed to really produce fantastic results the first time around, and as such your plants may not have enough time to produce a great harvest by the time summer has arrived.

The extra couple of months when sowing your chilli seeds early will allow your plant to take full advantage of this longer growing season, and you will be rewarded with a much greater and more worthwhile chilli harvest.

Although, it is important to remember that if you do sow your chilli seeds this early, that you only move them outside after the danger of last frost has passed.

So to summarise:

- Sow your chilli seeds as early as possible in the new year
- Make sure that you keep your seeds warm and the soil moist (but not soggy) until they germinate
- Only move them outside once the last frost has gone and make sure your plants receive a lot of light
- Follow our chilli growing instructions to get the best results from you chilli plants

You can still sow your chilli seeds in March, but you will have a much better chance at increasing your chilli harvests if you sow your seeds earlier in the season.


For more information about what to do when your chilli seeds have germinated, you can read our guide on how to grow chillies.


Until next time,
Happy chilli growing and please leave us a comment or any questions you may have.

Having trouble getting your chilli seeds to germinate? We have some expert tips for you.

Filed Under (Chilli Growing) by Chilli Willy on 15-12-2011

Tagged Under : , , , , , , ,

Getting started: How to germinate your chilli seeds successfully.

So you like a bit of heat in your food and you’ve decided to grow your own chillies. Fantastic, there is nothing better than picking fresh chillies from your own chilli plants you have grown from chilli seeds and then cooking with them!

Often the most difficult bit when growing chillies is getting your chilli seeds to germinate successfully. You might even start to think if growing chillies is for you or if you need extra green fingers to grow chillies from seed successfully.

Well fortunately, the answer is really simple. You see, the majority of chilli varieties come from hot countries and have adapted to the climate of these countries. This includes the temperature (related to the time of year) that the chilli seeds recognise and say…”Hey, I need to start germinating now!” By the way, if you do have a talking chilli, please get in touch and leave us a comment.

Luckily all you need to know to successfully germinate your chilli seeds or to solve poor chilli seed germination problems are a few simple tips, which we will list below:

1) Temperature

Often the most overlooked factor. Chilli seeds require a constant temperature in order to germinate successfully. However many first time growers leave their chilli seeds on a window sill in the kitchen or in the greenhouse to germinate, where the temperature may be high during the day due to heating and sunlight etc. but a lot colder during the night time. These sort of conditions confuse your chilli seeds and will probably cause them to think “Hey, it’s too cold for me to come out. Turn up the heating and we’ll talk!”

The actual temperature chilli seeds need to germinate is between 27-32 degrees C. The best way to achieve this is by using a heated propagator or a heated mat for germinating seeds. The propagator is the best way to go as they usually come with a lid to keep in the humidity, which can help speed up germination.

If you do not have a heated propagator then the airing cupboard is the next best thing. The temperature will often be fairly constant and in the range that chilli seeds require. Just place your seed trays or pots in the airing cupboard and within 7-10 days you should start to see seedlings emerge. Although some chilli seeds can take over 2 weeks to germinate so please be patient!

2) Moisture

Next you will need to make sure that you water your chilli seeds and keep the soil moist, but not soggy. This is important as excess water may cause your chilli seeds to rot before they germinate. A simple way to ensure the correct moisture level is to use your finger to test the surface of the soil and only add water when the surface of the soil is dry to the touch. Again, avoid overwatering. Use just enough to make the soil moist. Ideally you can use a spray mister to water your plants from above. This minimises soil disturbance. Less disturbance can speed up germination.

3) Sunlight

Once your chilli seedlings sprout, move them to a well lit area - a sunny window sill is perfect for this. This will ensure your plants will grow strong and not start off thin and whispy.

If you sowed a number of chilli seeds or have used separate pots (like our Chilli Willy 6 pot greenhouse kit) then you can move the individual pots from the airing cupboard as soon as they sprout. However if you follow these instructions correctly, most of your chilli seeds will start to sprout at around the same time. Remember, the important point here is to make sure the temperature and moisture levels are as constant as possible and you’ll soon see seedlings emerge.

That’s it! Now you know how to successfully germinate chilli seeds. Once your chilli seeds have germinated, you have done the hard bit, now you can enjoy watching your chilli plants go through the different stages of growth and then go on to produce tasty fresh chillies that you can cook with. For more information on growing chillies, have a look at our complete chilli growing guide.

Please leave us a comment with any questions or feedback you may have.

Did you know that chilli plants can produce fruit for many years?

Filed Under (Chilli Growing) by Chilli Willy on 11-12-2011

Tagged Under : , , , ,

Chillies plants can produce harvests for many seasons. Find out how you enjoy earlier and greater harvests.

It is a common misconception that chilli plants are annuals and only produce 1 harvest, after which you will have to grow your chillies from seed the following year. This is untrue as chillies are in fact perrenials and can provide you with many seasons of fruit if you look after them right. Find out how to do this by following the simple steps below:

First let’s take a look at the benefits of overwintering your chillies vs. growing from seed next season:

- Your chillies will have a head start over growing from seed
- You will get an earlier harvest as your plants are already mature and have good roots
- Chilli harvests increases year after year

Imagine doubling or even tripling your harvests of chillies next growing season (by the way you can also freeze your chillies if you don’t use them fast enough). This can easily be achieved by “overwintering” your plant. It’s a fancy word, but basically it means preparing your plant for the cold months ahead.

You see, chillies are like roses in a way, you need to prune them, to allow them to conserve their energy for next year’s growth. After all they are doing a lot of work for you!

However, roses are outdoor plants and chillies do not like the cold, so you will need to bring your chilli plants in when the temperature falls below about 10 degrees C. or at the first signs of frost. Normally November is the month to do this.

The first bit of advice is to make sure you feed your plant well throughout the year with a good chilli fertiliser like Chilli Focus. This will make sure your plant is strong enough and that it has all the nutrition it needs for the cold months ahead.

Next, you will want to bring your plants indoors before the first signs of frost, of when the weather is turning a little bit chilly (pun intended!).

After you have brought your chilli plants in, now it’s time to pick all the remaining chillies from the plant if you haven’t already as this tells your plant to grow more next season!

When all the chillies have been picked, then you need to prune your chilli plant back to about 1/3 of it’s original height or by leaving a stalk of about 15-30 cm. This may sound harsh, but all that extra foliage consumes important energy that your plant will need throughout the winter maintaining it’s root system.

Now your plant is ready for overwintering, bear in mind that you will need to water your plant a lot less over the coming months. Only water when the surface of the soil is dry to the touch. You can also reduce feeding to every 2 weeks.

Don’t worry if your plant does not grow much over the coming months, it will go into a dormant state while it hibernates. Make sure you keep your plant warm throughout winter and away from any draughts.

That’s it! Now all you need to do is wait until spring and you should notice some new shoots emerge within a few weeks of spring arriving as your plant wakes up. You can then move your plant outdoors (after the danger of last frost) or keep it on a sunny window sill.

And because your plant already has established roots and a strong stem, you should see rapid growth and benefit from a much larger and earlier harvest than the previous growing season.

Good luck overwintering your plants and be sure to see our guide on how to overwinter your chilli plants (includes pictures).

If you have any questions or comments, please leave them below.

Chilli Willy Newsletter